Google Drive is a free-to-use cloud service with a 15 GB limit storage. 15 GB is large enough to store documents, and "program" too. Yes, it's correct. We can program Google Drive. This blog is a step-by-step tutorial to show you how to build a simple P.O.S. system on Google Drive.
Create a Google Sheets to define the products
1. Login to Google Drive using your Gmail account and create a Google Sheets:
2. Input the products in the Google Sheets
Create a Google Forms for sale input
1. Create a new Google Form
2. Edit the form and the first field
Note that leave the option field unchanged. We'll assign it programmatically in below
3. Add a quantity field
4. Add a last field for the price input
How to copy data from Google Sheets to Google Forms?
We need to add a script to do that. Google developed Google App Script (GAS) for us to achieve that. Now go back to the Google Sheet we just created above. Then enter to the script editor
You'll see the below screen. Then change the script title
Then copy & paste the below codes to the script editor
Click the [Run] icon to run the script. For the first time, Google Sheet asks your permission. Click [Review Permissions] and sign in with your Google account. Then click the [Allow] button:
Then close the script editor. Go back to the Google Sheet. Insert a Drawing to create a button
Then the drawing board shows up
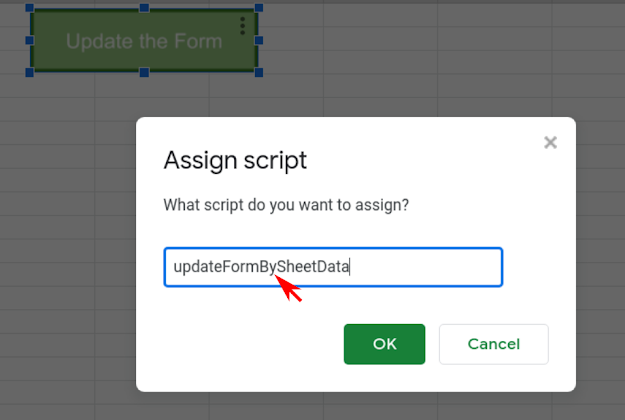
Click [Save and Close] when done. We'll need to assign the script for the button
Then type: updateFormBySheetData
After that, you can copy the product data from the Google Sheet to the Google Form when you click the button like this
Setup the Google Form Submission Data Save To the Google Sheet
Open the Google Form, and follow the below steps
Then select "Select existing spreadsheet" and select the Google Sheet we've created
Then open the Google Sheet. You'll see there's a new sheet
then we can name it freely such as Sale transaction.
Perform Daily Selling Operation
Before performing daily sell operations, we'll need to un-restrict other users can open the form. To do that, open the Google Form we've created above. Then follow the below steps
Then the settings windows popup, un-check the "Restrict to users ..." and Save the changes, as shown below
We are all set. We can perform daily selling input with the Google Form hyperlink. To obtain this hyperlink, open the Google Form we've created, and then follow the steps shown below
Then we can paste the hyperlink to the browser when perform selling every time. The form input is like this
After that, I submit several transactions. The results like below
Generate charts for sales analysis
The transactions can be aggregated and transform into meaningful reports. First, we need to make an amount column
Then we'll create a chart. First select Product and Amount columns
Then create a chart
Define the chart data
As you can see, the sales chart is more appropriate. Furthermore, we can add the product sold quantity alongside the amount
Below is the final chart
Conclusion
Google Drive is not only for store office files but a programming platform with no charge. We can program this platform with a scripting language called Google App Script (GAS). The syntax of the Google App Script is 100% Javascript because its kernel is a
V8 Engine. The same Javascript engine inside the Chrome browser. So GAS is powerful, high performance, and easy to learn.
I will write more blogs on GAS to demonstrate it is very good for office automation or rapid application development. Actually, it is something like a low-code development platform. But without a monthly fee.


Comments
Post a Comment