
The “Speed” problem
I’ve developed a Hong Kong based website (domestic parenting website) https://popa.help for my client in 2019. The site loads within 5 secs in Hong Kong. However, after I moved to Canada, the site loads more than 12 secs. It’s slower more than 100%. I suddenly realize that network latency is important for international users.
To solve this obstacle, I proposed Edge Computing to the client. And I’ve developed several POCs (proof-of-concept). Finally, I chose Cloudflare Workers and CouchDB. The result of the new site is 444% faster. The new implementation is mentioned in the below sections.
Introducing Cloudflare Workers
The existing site is running on AWS Lambda. Obviously, it is not an edge computing platform. Though it has Lambda@Edge, Cloudflare Workers are still easy to develop, running faster and lower cost than others. As mentioned in Cloudflare Wiki, Cloudflare is a web-known CDN provider that had installed over 200 data centers around the world. In Mar 2018, Cloudflare announced Workers (Cloudflare Workers). Cloudflare Workers is a serverless platform that runs Javascript Service Workers at the Edge data centers. The Cloudflare Workers webapp can respond to the user where it is the closest data center. This solves the network latency when request our current domestic webapp (based in HK) from anywhere in the world.
Unlike AWS Lambda, Cloudflare Workers runs Javascript using Google V8 (Javascript engine in Google Chrome) rather than NodeJS. V8 executes Javascript inside sandbox instead NodeJS executes inside a VM or container. In shorts, Cloudflare Workers performance is higher but I need to write more codes to fill the lack of NodeJS/ExpressJS.
Another killer feature of Cloudflare Workers is the deployment speed. When deploying the codes which can be less than 30 sec to globally 200+ cities.
Why CouchDB?
CouchDB is one of NoSQL databases like MongoDB. CouchDB’s distinguishing features is its couch replication protocol. It makes CouchDB clustering can perform multi-master replication (MongoDB can only perform master-slave cluster). Multi-master clustering is a perfect fit for Edge Computing. When a record is updated in any server, CouchDB auto-sync to others less than 1 sec. So, all users are seeing the same data no matter anywhere in the world.
You may wonder why not use Cloudflare Workers KV? After I fully tested, the KV has a limitation. The most serious obstacle is KV handling continuously reads/writes very slow. Much slower than CouchDB.
What’s the benefit to mix Cloudflare Workers with CouchDB?
As mentioned above, Cloudflare Workers is an Edge Computing serverless platform. It does a very useful feature: return the “ip-to-country code” in the request header ‘cf’ Object. That’s the country code of the user locating. I developed a simple mapping function to calculate the closest database server. The flow of the function as below:

I proposed the client to setup a CouchDB cluster. The 3 CouchDB servers were in Hong Kong, U.S. and U.K. The geographic locations of the CouchDB servers:
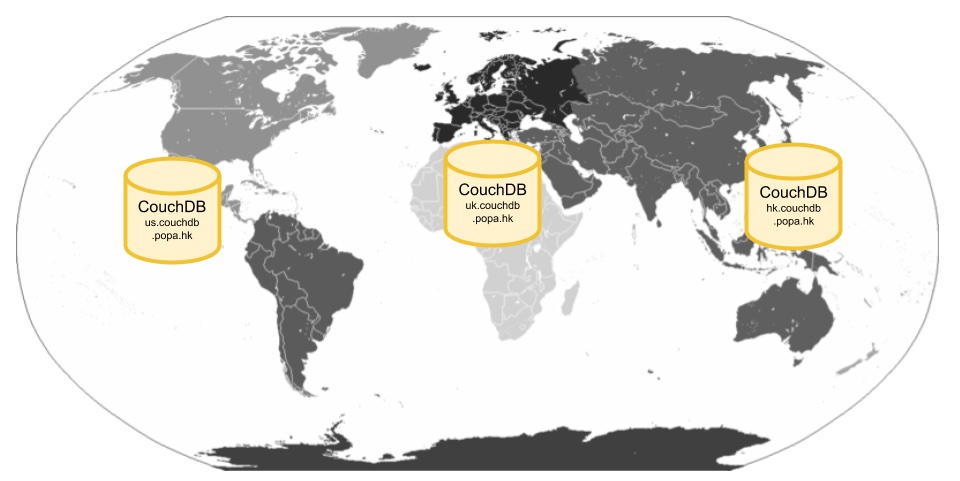
Below is the example cities map to CouchDB server results:
| Example cities | Continent | Destination server |
| Hong Kong | Asia | H.K. CouchDB server |
| Vancouver | North America | U.S. CouchDB server |
| Netherland | Europe | U.K. CouchDB server |
| Tokyo | Asia | H.K. CouchDB server |
| Sydney | Oceania | H.K. CouchDB server |
| Sao Paulo | South America | U.S. CouchDB server |
| South Africa | Africa | U.K. CouchDB server |
| Taiwan | Asia | H.K. CouchDB server |

After the infrastructure is setup, it’s time to develop Cloudflare Workers webapp.
Develop the webapp step by step
Prerequisite
- You’ll need a Cloudflare account
- Access to the API keys for that account
- Install the Wrangler command line interface
Coding
1. Create the project (naming edge-cloudflareworkers-couchdb):
$ wrangler generate edge-cloudflareworkers-couchdb https://github.com/cloudflare/worker-template-router
$ cd edge-cloudflareworkers-couchdb
2. Edit the wrangler.toml
name = "edge-cloudflareworkers-couchdb"
type = "webpack"
account_id = "[your cloudflare workers account id]"
workers_dev = true
route = ""
zone_id = "[your cloudflare workers zone id]"
Please refer to the official full instructions of Cloudflare Workers
3. Add the country code detection function
Open the source code index.js and modify function handleRequest() and add findNearestCdb(). The result is stored in this file.
4. Start the preview server
$ wrangler preview --watch
The program outputs
Screen 1: Get my current country code:

Screen 2: Closest server found:

Conclusion
The goal is SPEED. I am helping my client to implement edge computing. The site loading speed is reduced from 11.11s to 2.5s (444% faster):

The implementation is still work in progress. It is not only improving the backend but also the frontend. GraphQL and lit-element (web components) are implementing on the frontend to reduce network traffic and lightning-fast templating. Please leave a comment when you want me to show that 😉
Site speeds comparison (you’ll see the difference especially when you’re out of Hong Kong):
Comments
Post a Comment