What is the Chatbot CMS
I’ve developed and launched a WooCommerce chatbot (WcBot) business in January 2018. It is a mass commercial product. The chatbot main function is to connect between the WooCommerce and Facebook Messenger. See below diagram:
The target clients are WooCommerce store owners. WcBot is actually a WordPress plugin. When the clients installed and activated the plugin, the chatbot can be added to the store like below screenshot:
Chatbot features
The benefits of WcBot for the shop owner:
1. Instantly answering the messages sent from Facebook Messenger like:
- “Show me the products”
- “List the category”
- “Which product price under 30?”
- “How about the price between 10 and 20?”
- “Find product tshirt”
- “View my shopping cart”
Example reply screenshot:
2. WcBot has a built-in shopping cart. Wcbot supports whole buying experience inside the chatbot. The whole buying experience means that allows end-users to:
- Add item(s) to cart
- Review/Modify shopping cart items
- Input billing & shipping address
- Select shipping method
- Online payment: Payment methods support PayPal, Braintree, Stripe, cheque, C.O.D. and self-pickup
- Automatically tax calculation
- Automatically shipping fee calculation
Example shopping cart screenshot:
3. Seamlessly integrates with WooCommerce. The WcBot is not running alone. The info transfer between the Messenger and WooCommerce are frequently. These include:
- Retrieving products, categories, orders, shipping, payment from WooCommerce.
- Products lookup, prices lookup always query the WooCommerce instantly.
- Save the paid orders to the WooCommerce.
- Tax fees and shipping fees are retrieved from WooCommerce.
- The store owner can perform order handling via conventional WooCommerce admin.
Example order handling in WooCommerce:
Technical Details
How To Make It Happen
To achieve the Chatbot can connect with Facebook Messenger and WooCommerce, I’ve developed a web server to communicate with:
- Messenger Webhook
- WooCommerce via REST API
Messenger Webhook
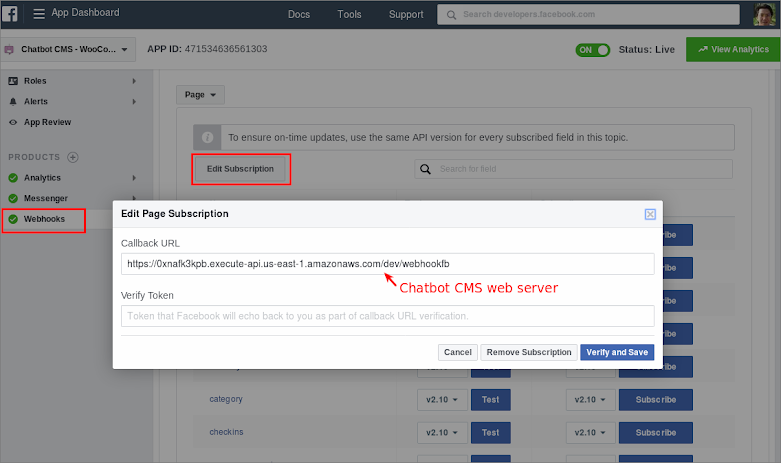
Messenger Webhook is the core of the Messenger chatbot communication channel. Whenever the end-user sending messages and receiving chatbot replies are all via the webhook. I noticed that Webhook requires a Facebook App. Moreover, the Facebook app requires a Facebook Page association. So, the setup steps are quite complicated. I’ve published a step-by-step guide in the WcBot documentation. Below is the screenshot of the Messenger webhook setup page:
WooCommerce REST API
WooCommerce releases a REST API interface for developers to manipulate the data. WcBot is using this API to communicate with the WooCommerce servers. I noticed that WooCommerce REST API implements access control. Every API call requires an authorized API key. The API key is generated by the WooCommerce server when it authenticated by the shop owner. I developed a WordPress plugin for the authentication as below screenshot:
WcBot web server
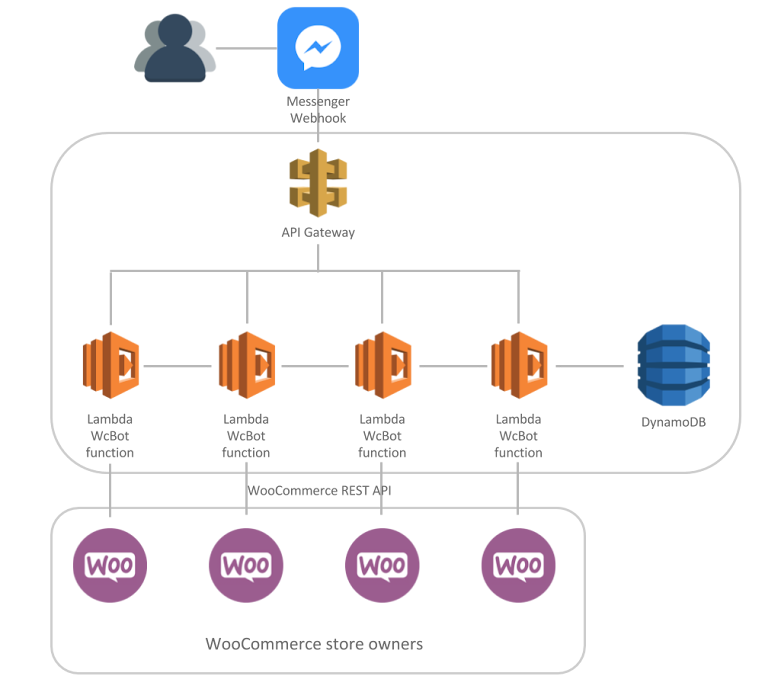
WcBot web server is the main service hub between Facebook Messenger and WooCommerce servers. The WcBot web server is hosting in AWS Lambda. Below is the diagram to explain the system architecture:
Flow of Message Handling
WcBot does a lot of message processing. I implemented a Natural Language Processor using RiveScript. When an end-user sends a message and receives the reply. The detail is explained as below flowchart:
Shopping Cart Mini-site
WcBot has a built-in shopping cart that supports online payment. For best user-experience, end-users can buy products directly inside the chatbot without the needs of the WooCommerce shopping cart. This is a unique feature of WcBot.
The shopping cart actually is a mini-website. It is a Responsive Web Design based on Semantic-UI. The website frequently communicates with the WcBot web server via the RESTful interfaces. Such data I/O include:
- Shopping cart items
- Product info in WooCommerce
- Shipping/payment settings in WooCommerce
- Create and save the orders to the WooCommerce
See below diagram for the web pages rendering flow:
The Challenges
Every development project has more or less challenges. WcBot development has followed challenges.
Challenge 1: Server Programming
Version 1 of the WcBot server is written in NodeJS. But version 2 is re-written in Python. See below table for the characteristics of different versions:
| Version | Language | Framework | Database | Server Hosting |
| 1 | NodeJS | ExpressJS | MongoDB | Ubuntu VPS in DigitalOcean |
| 2 | Python | Flask | DynamoDB | Amazon AWS Lambda |
I loved NodeJS. Especially loving it’s light-weight and async I/O (see this blog post to introduce this). But why I changed from NodeJS to Python? The reason is Python is the most widely used in the AI field. It is easy to learn. Take less time to finish the tasks. When comparing with NodeJS, I’ve written a lot of codes to handle asynchronous and callbacks. For instance, below is the code fragment to handle view product in NodeJS:
In contrast, below is the python code fragment to do the same task:
Not only the total number of lines is reduced by nearly 50%, but also the codes are more straightforward and easier to code and read. In the future, I can put all efforts to improve chatbot intelligence. Another reason is scalability. Python/Flask perfectly support serverless architecture. Flask can handle all web traffic from Lambda. I just only need to define one handler. See below fragment in my serverless.yml:
...
# Forward all traffic to Flask handle
functions:
  app:
    handler: wsgi.handler
    events:
      - http: ANY /
      - http: 'ANY {proxy+}'
...
The cons of Python is much slower than NodeJS. Slow performance affects scalability. To address these cons, I’ve selected AWS Lambda and DynamoDB. AWS Lambda provides great support for scalability. DynamoDB supports auto-scaling as well.
Challenge 2: WooCommerce Complexity
WooCommerce is a robust e-commerce platform. It supports different shipping classes, shipping zones, and allow shop owners to input complex calculation formulas such as:
- 10 + [qty] * 0.10
- 20 + [fee percent=”10” min_fee=”4”]
- [qty] * 10 + [fee percent=”10” min_fee=”4”]
This calculation is handled in the WcBot shopping cart mini-site at the checkout page. I did a little experiment on several Javascript libraries to deal with this. Finally, I chose this lexer javascript package. Actually, it works perfectly.
Another WooCommerce setting I need to handle is checkout settings. The shop owners can input their payment options in there. (such as BACS, cheque, C.O.D., PayPal, Braintree, Stripe). The shopping cart mini-site has the ability to read those settings and render it into the payment webpage. It involves the SDKs of PayPal, Braintree, and Stripe payment. Braintree and Stripe are tokenized RESTful communication. All these logic are handled in the WcBot server Python Flask program module.
Challenge 3: Making Web Pages In AWS Lambda
AWS Lambda is executing in various micro functions instead of a real web server. So that I cannot make this assumption to show a webpage: http://xxx.amazonaws.com/[A_Web_Page].html
I needed to build a Lambda function to render it into HTML. Now it is: https://xxx.amazonaws.com/MakeWebPage?page=orderPayment&OrderId=XXX
Thanks to Serverless Framework tightly integrate with Flask. The code is that:
...
return render_template("orderPayment.html")
...
Thus the Lambda function returns the HTML page from template orderPayment.
Conclusion
Now this chatbot (WcBot) business is running well. I launched its Facebook Page (for marketing purpose) and got more than 300 likes less than a month. And 7 members joined its closed group.
From the response of audiences, WcBot has a bright future. I have a lot of passion for that. I want to make it supports stock control, various color/size product selling, international languages, and more… Maybe convert the shopping cart mini-site into direct sales in chatting.
Resources
Below are the hyperlinks related to this project:
- WcBot marketing Facebook Page
- WcBot product and plugin download page
- Shop owner guides
- WcBot Server Open Source Github repo
- My Blog post described Natural Language Processing using RiveScript and NodeJS
- My Blog post described PayPal, Braintree, Stripe SDKs programming in NodeJS
- My Blog post described Semantic-UI and NodeJS Server-Side Rendering
- My Blog post described how to create online shop (GoDaddy + WooCommerce + SSL + PayPal + ChatbotCMS) in lowest cost


Comments
Post a Comment